Beef Shoulder Roast Recipe: 7 Steps to Your Best Dinner Yet!
The Undercut Hero: Why Beef Shoulder Roast Recipe Might Be Your Secret Weapon
Did you know that nearly 70% of home cooks overlook the humble beef shoulder roast for fancier, pricier cuts like tenderloin or ribeye? Yet, this budget-friendly, flavor-packed star delivers melt-in-your-mouth results that rival its expensive cousins. When slow-cooked or braised to perfection, it transforms into something magical – deeply savory, incredibly tender, and endlessly versatile.
If you’re craving a juicy, tender dinner? Perfect your beef shoulder roast recipe with our 7-step guide. Discover tips for a meal that impresses every time. Forget dry, tough roasts forever! This economical cut demands time and gentle heat, but rewards you generously. Here’s how to master it.
Table of Contents
🧾 What you need: Ingredients for preparing the roast beef shoulder recipe
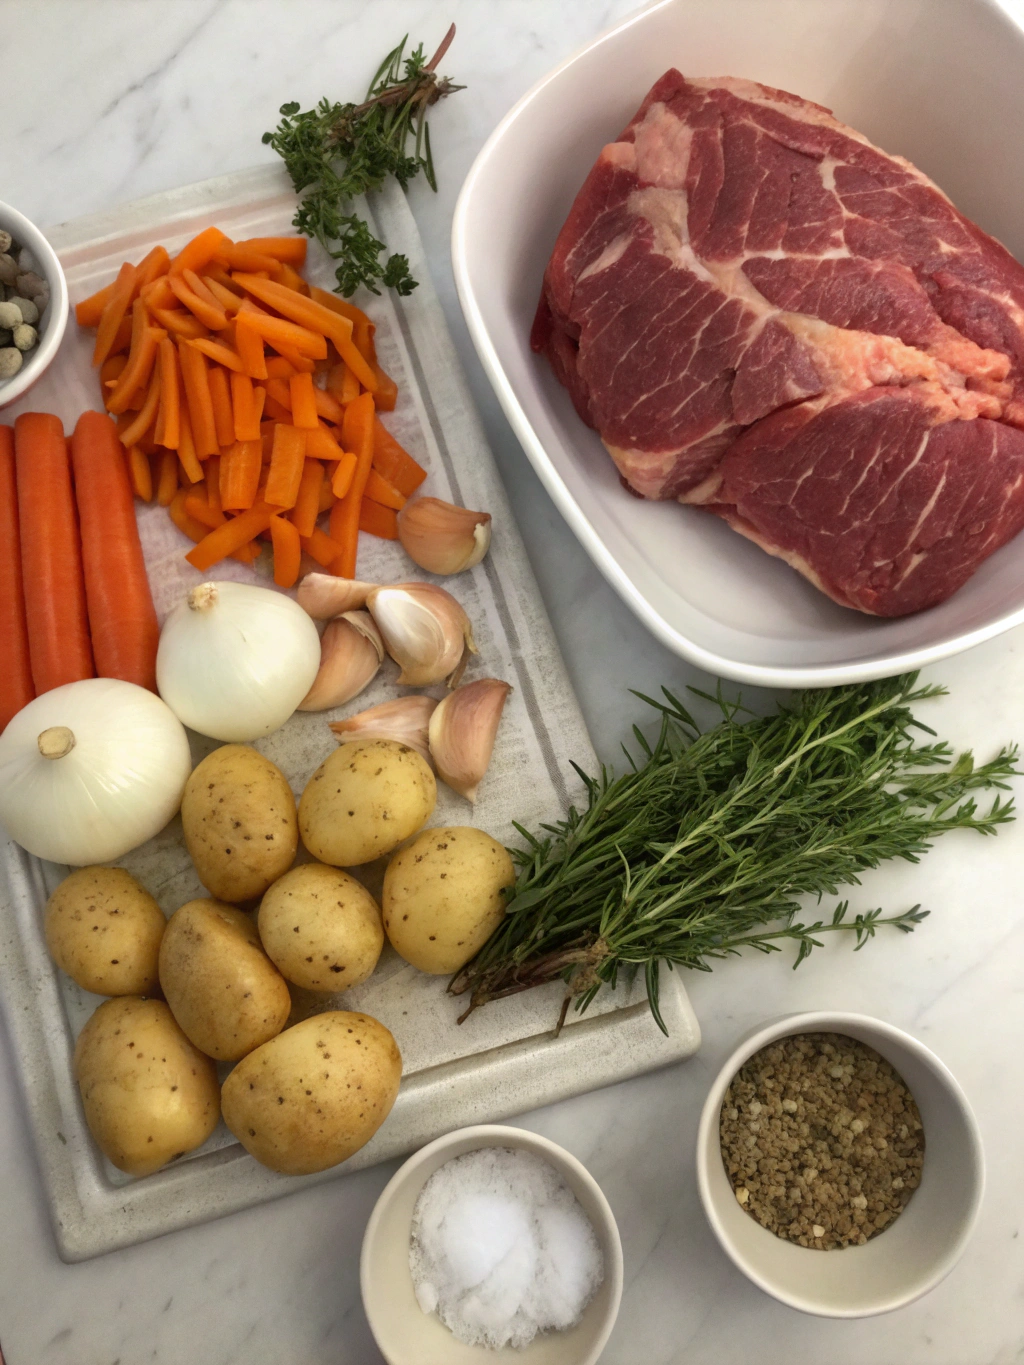
- The Star: 1 (3-4 lb) beef shoulder roast (a.k.a. chuck roast blade or arm roast) – Look for good marbling!
- Flavor Base:
- 2 tbsp high-heat oil (avocado, grapeseed, or vegetable oil)
- 1 large yellow onion, roughly chopped
- 4 carrots, cut into 2-inch chunks
- 3 celery stalks, cut into 2-inch chunks
- 4 cloves garlic, smashed
- Searing & Deglazing Magic:
- 1 tbsp tomato paste
- 1/2 cup dry red wine (like Cabernet Sauvignon or Merlot) OR beef broth
- The Braising Liquid:
- 2-3 cups low-sodium beef broth (enough to come halfway up the roast)
- 2 sprigs fresh rosemary
- 3 sprigs fresh thyme
- 2 bay leaves
- Flavor Boosters:
- 1 tsp smoked paprika
- Salt and freshly ground black pepper (generous amounts!)
Substitution Savvy:
- No Wine? Double the beef broth and add 1 tbsp Worcestershire sauce or balsamic vinegar for depth.
- Veg Swaps: Substitute parsnips or turnips for carrots. Leeks work instead of some onion.
- Herb Variations: Dried herbs work (use 1/3 the amount). Oregano or marjoram can complement.
⏱ Timing is Everything: Embrace the Low & Slow
While hands-on time is minimal, patience is key:
- Prep: 20 minutes
- Searing: 15 minutes
- Cooking: 3 to 3.5 hours (Oven) / 8 hours low (Slow Cooker)
- Resting: 20 minutes (CRUCIAL!)
- Total Time: Approx. 4 hours (mostly hands-off)
Compare This: Active time is just 35 minutes for a dish that tastes like you labored all day – a 90% hands-off win!
🔥 Your 7-Step Journey to Perfection
Step 1: Prep Powerhouse (5 min)
Pat the roast DRY with paper towels. This is non-negotiable for the best sear! Generously season all sides with salt, pepper, and the smoked paprika. Let it sit uncovered at room temp while you chop veggies. (Tip: Room-temp meat sears better!)
Step 2: Sear for Success (10-12 min)
Preheat your oven to 325°F (165°C). Heat the oil in a large, heavy-bottomed Dutch oven over medium-high heat until shimmering. Carefully add the roast. Sear undisturbed for 5-6 minutes per side, including edges if possible, until deeply browned. Remove to a plate.
Step 3: Build the Flavor Base (5 min)
Reduce heat to medium. Add onion, carrots, and celery. Sauté 5-7 minutes until softened. Add garlic and tomato paste. Cook, stirring constantly for 1 minute, letting the tomato paste caramelize slightly. Pour in the wine/broth, scraping the bottom vigorously with a wooden spoon to release all those delicious browned bits (fond)!
Step 4: The Gentle Simmer Begins (3-3.5 hours)
Return the seared roast to the pot, nestling it into the veggies. Pour in enough broth to come halfway up the sides of the roast. Tuck in the rosemary, thyme, and bay leaves. Bring the liquid just to a simmer. Cover the pot TIGHTLY with its lid. Transfer to the preheated oven. Let the low, even heat work its magic for 3 to 3.5 hours. (Data Insight: Collagen starts converting to gelatin above 160°F/71°C, but low heat prevents muscle fibers from aggressively tightening and squeezing out moisture!)
Step 5: Tenderness Test – The Pinnacle! (1 min)
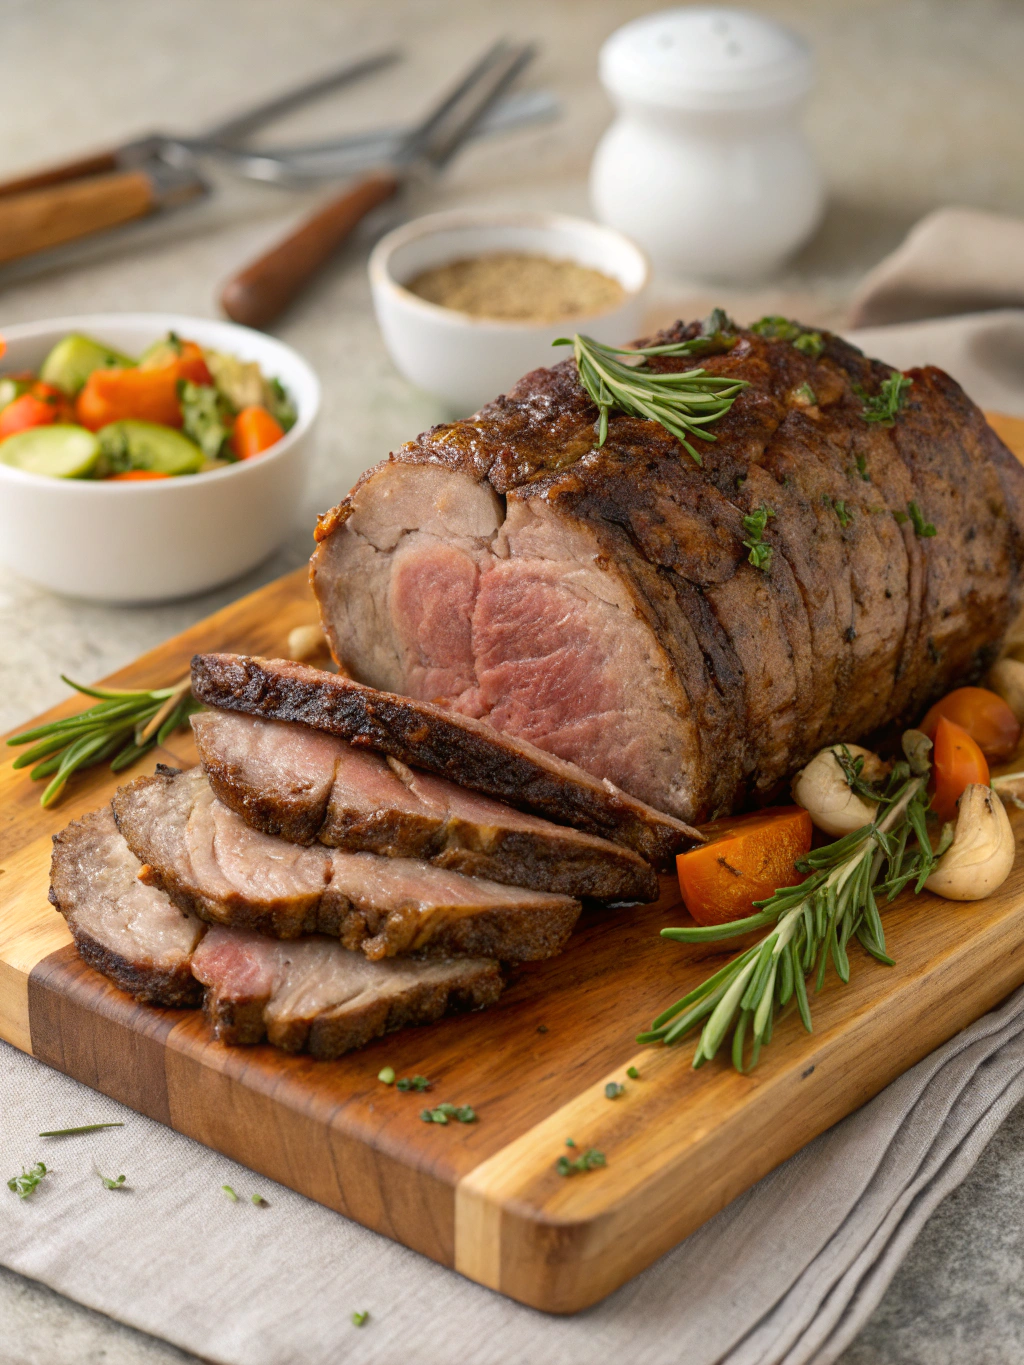
The roast is ready when it yields dramatically to gentle prodding with a fork. A meat thermometer should read around 200-205°F (93-96°C) for shredding tenderness. Carefully transfer the roast to a clean plate or cutting board. Tent loosely with foil and LET IT REST for at least 20 minutes.
Step 6: Sauce Symphony – Optional But Rewarding (10 min)
While the meat rests, skim excess fat from the surface of the braising liquid. Remove herb stems and bay leaves. For a thicker gravy, strain the solids out (you can mash some veggies back in for texture!). Simmer the liquid until slightly reduced. Alternatively, blend some cooked veggies into the broth for a rustic sauce. Taste and adjust seasoning.
Step 7: Shred or Slice & Serve! (5 min)
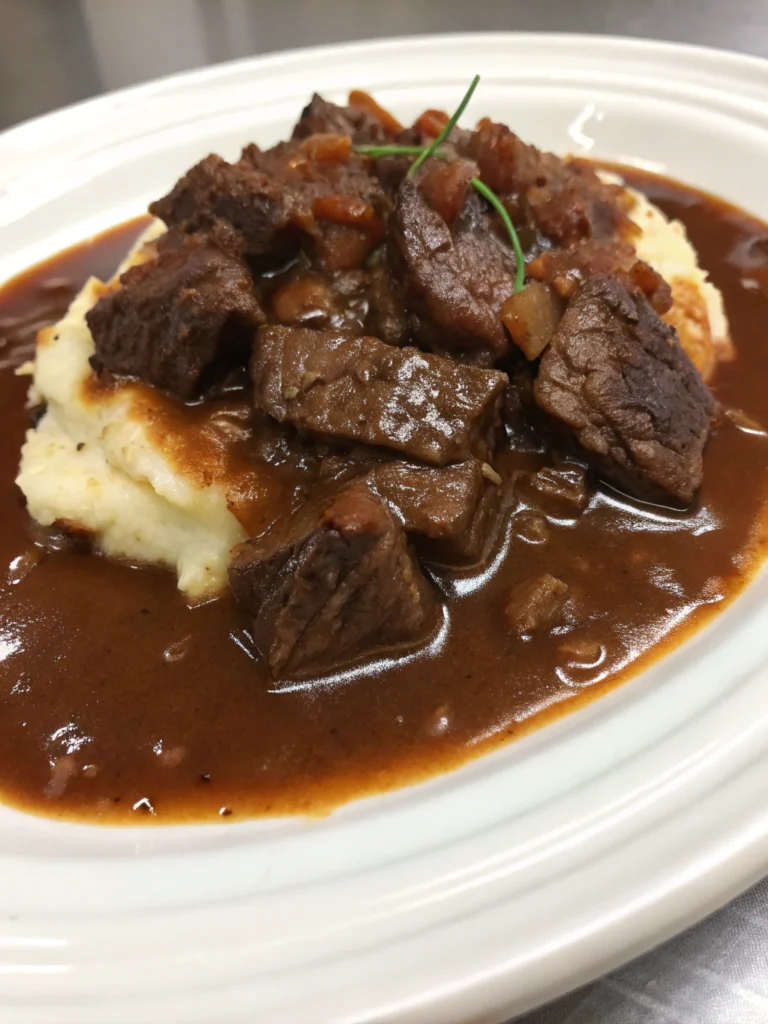
Using two forks, gently shred the rested beef shoulder roast. It should pull apart effortlessly! Alternatively, slice against the grain. Serve bathed in that luscious, rich cooking liquid/sauce.
📊 Nutritional Profile Per Serving (Approx. 1/8th of Roast w/Sauce)
- Calories: 410 kcal
- Protein: 45g (Excellent source!)
- Fat: 22g (Saturated: 8g – Mostly from marbling in beef)
- Carbohydrates: 7g (Fiber: 2g, Sugars: 3g – Primarily from veggies)
- Iron: 20% DV
- Zinc: 35% DV
- Vitamin A: 110% DV (Thanks, carrots!)
- Vitamin C: 15% DV
- Vitamin B12: 150% DV
Key Insight: While richer than leaner cuts, a portion provides high-quality protein, essential minerals like iron and zinc (often under-consumed), and significant vitamin A. The slow cooking method minimizes added fats compared to pan-frying steaks!
🥗 Healthier Twists Without Sacrifice
Make this masterpiece even more nourishing:
- Veggie Power: Double the carrots, celery, and onions. Add chopped mushrooms or hearty greens (kale, collards) in the last 30 mins of cooking.
- Leaner Prep: After cooking, refrigerate the cooking liquid overnight. Easily remove the solidified fat layer before reheating for significantly reduced saturated fat.
- Salt Savvy: Use strict low-sodium broth and control added salt. Lean on herbs, spices (add cumin or chili powder!), citrus zest, or umami bombs like mushrooms for flavor depth.
- Alternative Braising: Substitute the wine entirely with low-sodium beef broth enriched with 1 tbsp apple cider vinegar or unsweetened pomegranate juice for tang.
- Dairy-Free Creaminess: Blend soaked cashews or white beans into the sauce base for creaminess without cream. (Great for dairy-free/Whole30!)
🍽 Serving Suggestions: Beyond the Roast
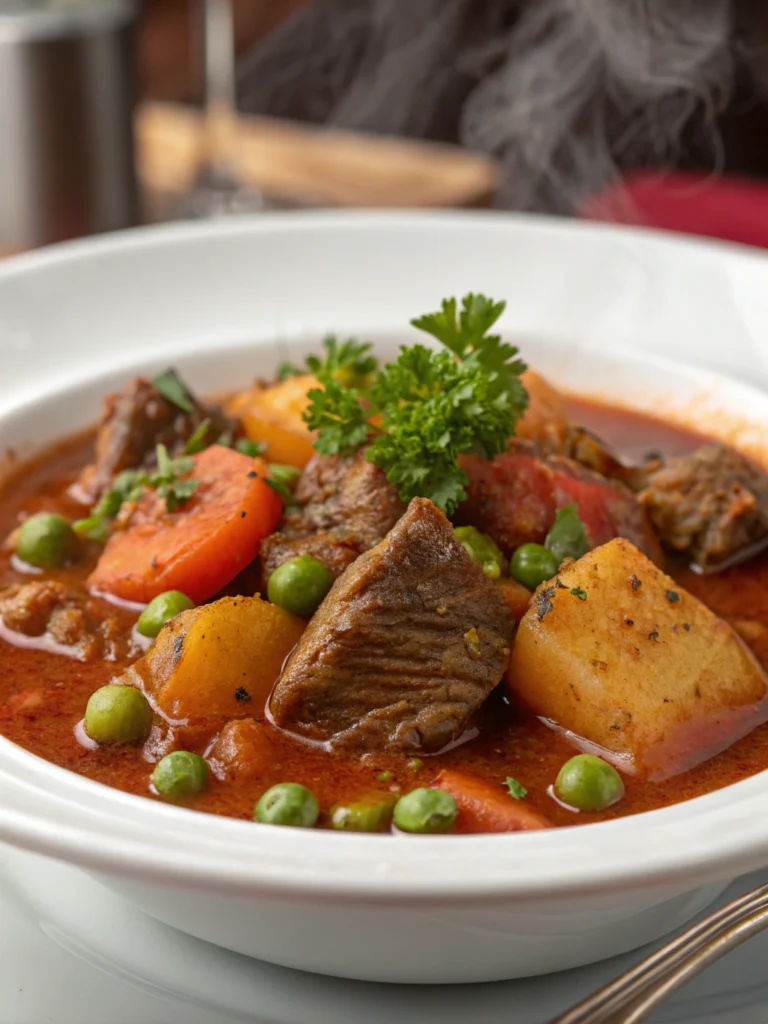
- Classic Comfort: Serve shredded over creamy mashed potatoes, polenta, or cauliflower mash. Spoon plenty of sauce!
- Grain Bowl Brilliance: Flake onto bowls with brown rice/quinoa, roasted broccoli, and a dollop of horseradish yogurt sauce.
- Sandwich Star: Pile onto crusty rolls with melted provolone cheese and sautéed onions for killer French dips. Use that sauce for dipping!
- Taco Twist: Shred and mix with a squeeze of lime juice and chopped cilantro. Serve in warm corn tortillas with avocado crema.
- Next-Day Magic: Transform leftovers into hearty beef barley soup, savory pot pies, or a topping for baked potatoes.
⚠ Common Pitfalls & How to Dodge Them
- Skipping the Sear: = FLAVOR LOSS! DO NOT skip this step. Searing builds the Maillard reaction flavor foundation.
- Crowding the Pot: Sear in batches if needed. Crowding steams, not sears. Your roast deserves that crust!
- Boiling, Not Braising: After searing/adding liquid, keep it at a low simmer. A rolling boil toughens meat. Your oven’s low heat is perfect.
- Underseasoning: Shoulder roast is dense! Season aggressively before searing and again before braising if needed.
- Undercooking: Shoulder NEEDS long, slow cooking to break down. It should be fork-tender, pulling apart effortlessly. Don’t be tempted to cut short; collagen conversion takes time!
- Skipping the Rest: Cutting in too soon releases juices wildly. Resting lets them redistribute = juicier meat!
🧊 Storing Like a Pro: Leftover Luxuries
- Cool Quickly: Divide leftovers (meat and liquid) into shallow containers. Cool to room temp within 2 hours (don’t leave it out longer!).
- Fridge Fine: Store airtight for up to 4 days. Flavors meld beautifully overnight! Include liquid to prevent drying.
- Freezer Friendly: Freeze shredded meat in its sauce/cooking liquid in airtight bags or containers for up to 3 months. Thaw overnight in the fridge.
- Reheat Gently: Reheat on the stovetop over low-med heat, covered, with a splash of broth/water to maintain moisture. Avoid microwaving aggressively.
🎉 Conclusion: Your Impressive Dinner Awaits
You’ve got the map! This beef shoulder roast recipe unlocks the incredible potential of an affordable, forgiving cut. Remember the pillars: Pat Dry & Season, Sear Thoroughly, Braise Low & Slow, Rest Tenderly. The payoff is unrivaled tenderness and flavor that fills your home with anticipation. Whether you choose classic braised goodness, a slow cooked beef shoulder,braised beef shoulder,oven roasted beef shoulder,beef shoulder pot roast approach, or even adapt it for other methods – this method builds unshakeable culinary confidence.
Ready to experience the magic? Pick up that shoulder roast this weekend and treat yourself and your loved ones. We absolutely crave hearing your stories! Tag us on social media with your masterpiece and tell us: what’s your favorite way to serve this comfort classic? Need more inspo? Explore our ultimate collection of simple, show-stopping meat recipes here. Happy slow cooking!
❓FAQs: Beef Shoulder Roast Demystified
Q1: Can I use a slow cooker or Instant Pot instead of the oven?
- Absolutely!
- Slow Cooker: Follow steps 1-3 on the stovetop. Transfer everything to the slow cooker. Cook on LOW for 8-10 hours.
- Instant Pot: Sear using Saute mode (Steps 1-3). Add liquids (don’t exceed max fill line). Secure lid. Pressure Cook on High for 65-75 minutes. Allow 15-20 minutes Natural Release, then vent. Both methods REQUIRE resting.
Q2: My roast seems tough even after cooking! What went wrong?
- Undercooking is almost always the culprit. The internal temp might be over 190°F, but it needs time held at that temp to tenderize. Return it to the oven (covered) at 300°F for 30-45 min and recheck. Collagen conversion to gelatin peaks between 190-205°F and needs sustained time.
Q3: Can I make this gluten-free?
- Yes! It’s naturally gluten-free. Ensure your broth is certified GF and skip thickening with flour or use a cornstarch/arrowroot slurry at the end of cooking. All other core ingredients are GF.
Q4: What if I don’t have fresh herbs?
- Dried work too! Use 1/3 the amount of dried herbs since they’re more concentrated. Add them when you add the tomato paste/garlic. Example: 1 tsp dried thyme, 1/2 tsp dried rosemary. Dried bay leaves are fine 1:1.
Q5: Can I prepare this ahead?
- 100%! Beef shoulder roast often tastes even better the next day. Make it entirely up to 24 hours ahead. Cool, cover tightly, and refrigerate. Gently reheat in a covered pot at 325°F (adding a splash of water/broth if needed) for 30-45 mins until heated through. It freezes beautifully too.
Q6: Is beef shoulder roast the same as chuck roast? Or pot roast?
- Beef shoulder comes from the chuck primal (front shoulder). It often gets labeled “chuck roast,” “arm roast,” “blade roast,” or simply “shoulder roast.” “Pot roast” refers to the method (slow-braised), not a specific cut. Shoulder/Chuck is arguably the best cut for traditional pot roast!
Leave a comment if you try this recipe.
There are no reviews yet. Be the first one to write one.