Vegan Fudge Recipe: 5 Easy Steps for Rich, Creamy Bliss
Did You Know Vegan Sweets Saw a 600% Growth Spike Since 2020?
The data doesn’t lie: plant-based desserts are exploding in popularity, proving that indulgence doesn’t require animal products or compromise. If you’re among the millions craving decadence without dairy, this vegan fudge recipe is your golden ticket to creamy satisfaction. Forget complicated techniques or specialty ingredients – we’re revealing a foolproof 5-step method that delivers melt-in-your-mouth perfection every time.
Whether you’re a seasoned vegan baker or just dairy-free curious, this recipe turns pantry staples into blissful squares that’ll make skeptics swoon.
Why settle for store-bought versions packed with processed sugars when pure, homemade richness is minutes away? Let’s conquer that sweet tooth sustainably!
Table of Contents
Ingredients You’ll Need
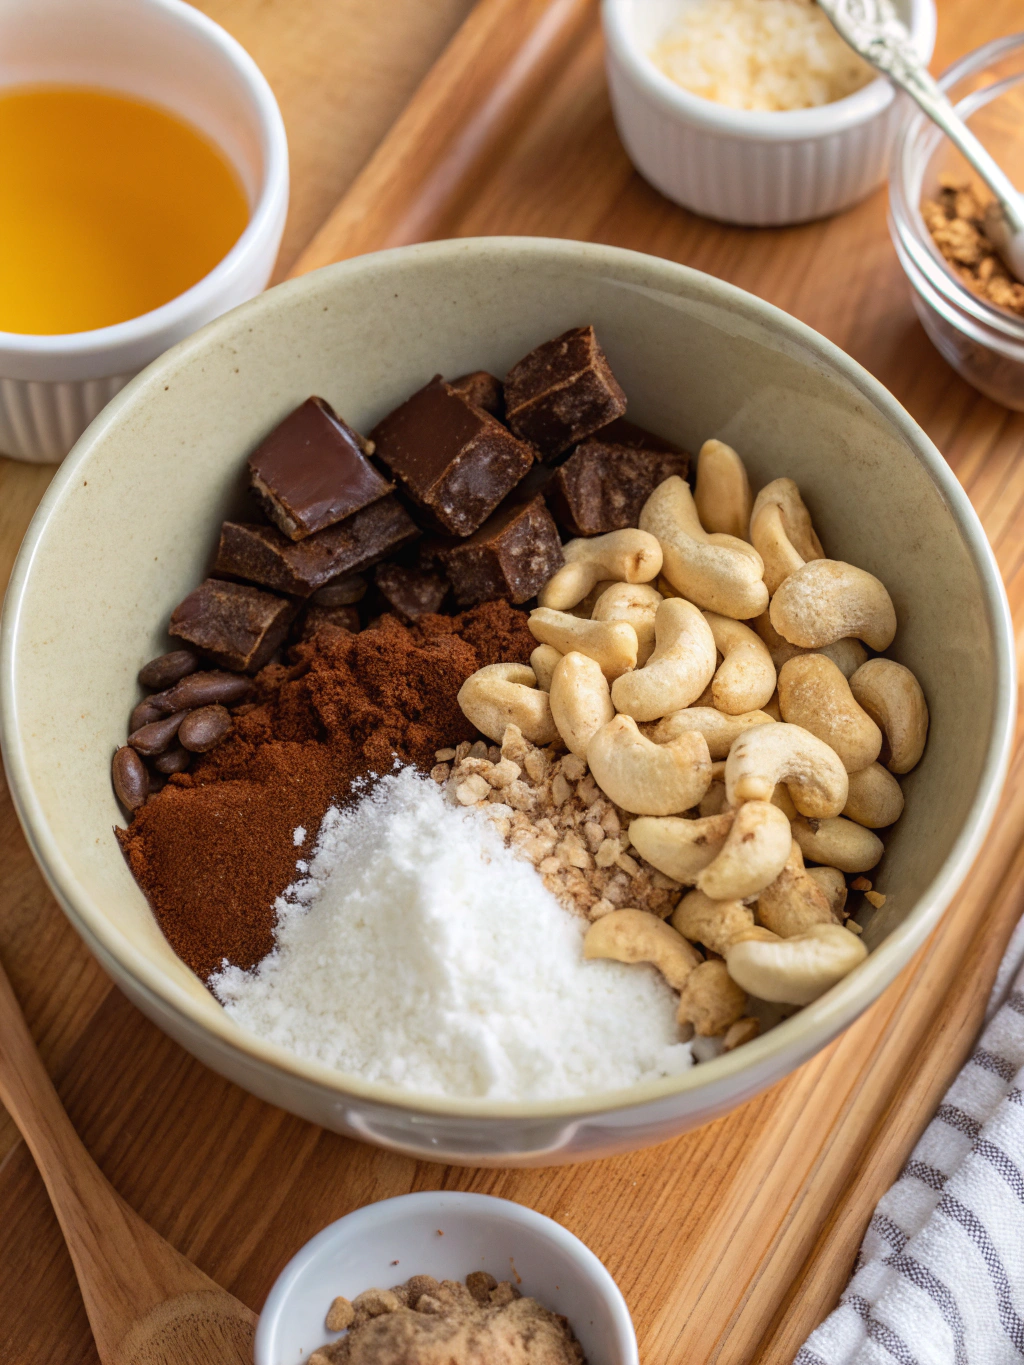
- 2 cups (approx. 340g) Vegan Dark Chocolate Chips or Chopped Bar Chocolate (70% cocoa or higher recommended): Look for brands labeled dairy-free. Raw cacao chips work wonders for intense flavor! Substitute tip: If out of chips, chop two 150g high-quality dark chocolate bars.
- 1 (14oz / 400ml) Can Full-Fat Coconut Milk (Refrigerated overnight if possible): Do NOT use “lite” versions – the luxurious fat content is crucial for creamy texture! Skim the solidified cream from the top when chilled for extra richness.
- ½ cup (125g) Creamy Nut or Seed Butter: Smooth peanut butter is classic, but almond, cashew, or sunflower seed butter creates unique twists.
- ¼ cup (80g) Maple Syrup or Agave Nectar: Adjust to preferred sweetness level. Coconut nectar works well for a lower glycemic option.
- 1 teaspoon Pure Vanilla Extract: Enhances depth – use the premium extract for a no-alcohol bite.
- Pinch Sea Salt (optional but recommended): Balances sweetness and brightens the chocolate notes. Flaky Maldon works beautifully.
- Optional Flair: ¼ cup chopped nuts (pecans, walnuts); 2 tbsp freeze-dried raspberry powder; orange zest; pinch cayenne pepper for heat.
Total Time Commitment
Prep Time: 10 minutes | Setting Time: 2-4 hours (or overnight) | Total Time: ~2 hours 10 minutes to 4 hours 10 minutes (mostly hands-off!)
Significant Time Saver Alert: Compared to traditional cooked sugar fudge requiring thermometers and precision, this no-bake approach slashes active time by nearly 80%. You gain rich, complex flavors without standing over a stove!
How to Make Dreamy Vegan Fudge in 5 Fail-Proof Steps
1. Prepare Your Setup & Melt the Foundation
Action: Line an 8×8 inch baking pan with parchment paper, allowing overhang on two sides for easy lifting later. Combine chocolate chips and the solid coconut cream portion only (reserve liquid for smoothies!) in a medium heatproof bowl.
Personalized Tip: Double boiler novice? Place the bowl over a small pot with 1 inch of simmering water (not boiling!) ensuring the bowl doesn’t touch the water. Stir constantly with a silicone spatula until just melted. Avoid microwaving unless heating in 15-second bursts with stirring.
2. Create the Velvety Base
Action: Remove bowl from heat. Immediately whisk in nut butter, maple syrup, vanilla extract, and sea salt until perfectly smooth and glossy. Consistency should resemble thick chocolate ganache. Taste and adjust sweetness with an extra tablespoon of syrup if needed.
Data Insight: Nut butter enhances texture stability. Research indicates its emulsifying properties bind fat and liquid, preventing graininess you might find in milk-free fudge.
3. Incorporate Elegant Extras & Pour
Action: Gently fold in any extras like chopped nuts or zest using the spatula. Scoop this luscious mixture into your prepared pan. Spread evenly into corners and smooth the top.
Creator’s Touch: For a restaurant-worthy presentation, tap the pan firmly on the counter 5-6 times after filling. This removes air bubbles ensuring ultra-dense, satisfying texture. Garnish top with extra sprinkles of salt, nuts, or zest.
4. Patience is Supreme – The Firming Phase
Action: Carefully transfer the pan to the refrigerator. Chill uncovered until completely set – this typically takes at least 2 hours but 4 hours or overnight yields the best slicing results.
Texture Truth: Coconut fat firms perfectly at cool temps! Rushing by placing in the freezer can cause cracking. Trust the process – this step ensures clean solid squares.
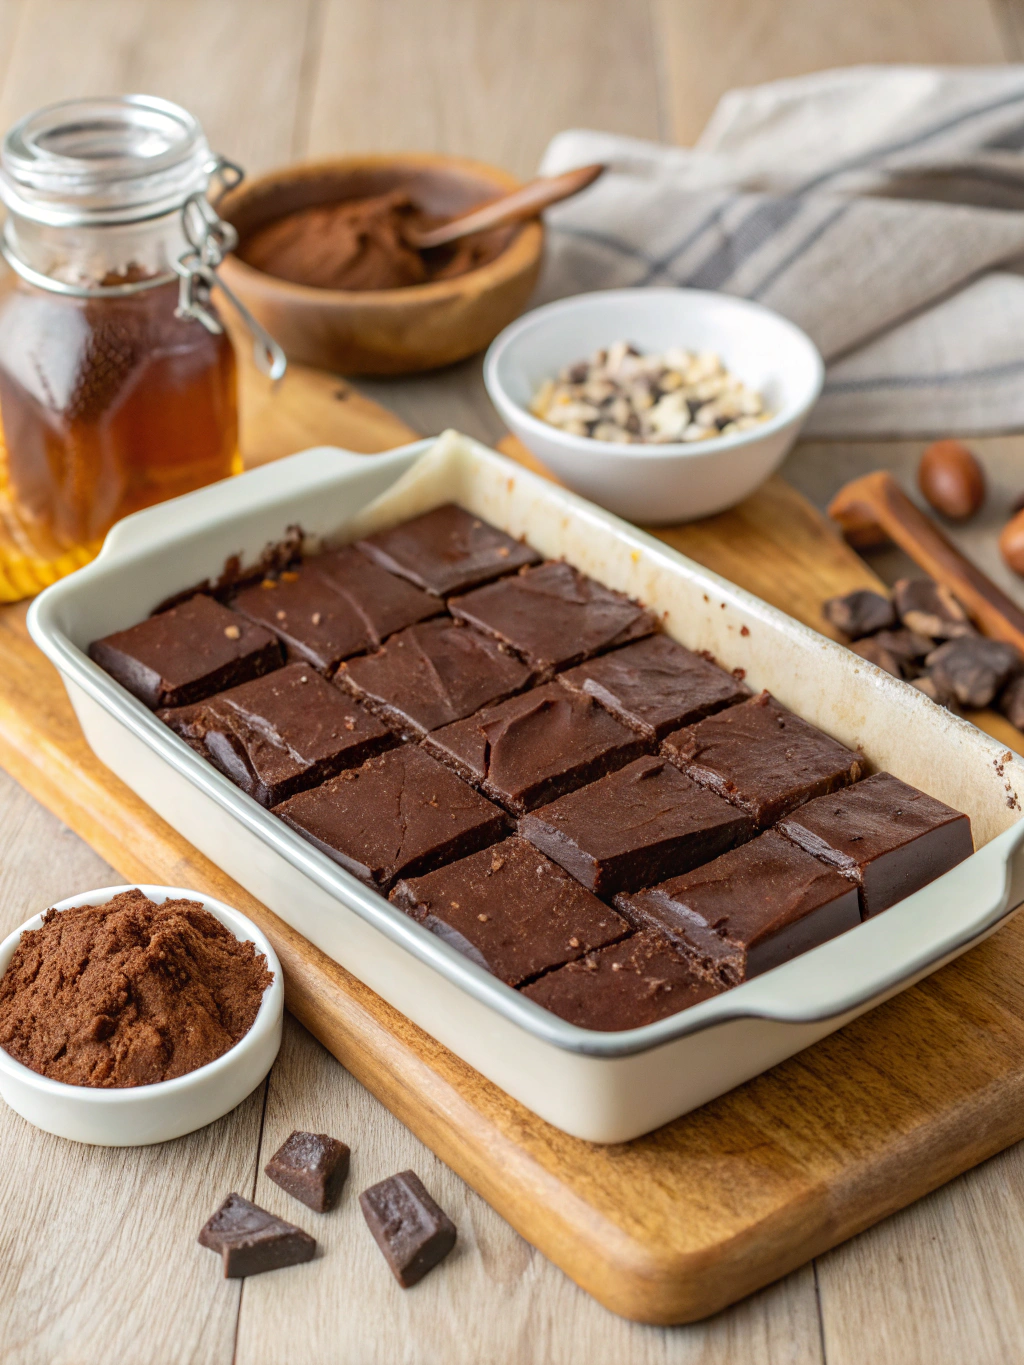
5. Slice & Encounter Fudge Nirvana
Action: Lift the fudge block out using a parchment overhang. Place on cutting board. Using a large sharp knife, wipe the blade with hot water and dry between cuts for super clean edges. Cut into 1-inch squares.
Savvy Slice: For uniform pieces, use a ruler! A large knife prevents dragging and ensures weight does the work over your wrist.
Nutrition Deep Dive (Per 1 Square, 36 Total)
Calories: ~110 | Total Fat: 8g (Saturated: 5g) | Sodium: 15mg | Total Carbohydrates: 8g (Dietary Fiber: 1g | Sugars: 6g) | Protein: 1g | Iron: 10% DV
Positive Note: Higher in healthy fats (coconut + nuts) than traditional fudge, provides quick energy & antioxidant-rich cocoa. Contains no cholesterol!
Boost Benefits – Healthier Twists
Keto/Paleo Fans: Swap maple syrup for 1/4 cup Monk Fruit syrup + 1 tbsp low-carb liquid sweetener. Ensure unsweetened chocolate.
Lower Sugar Craving: Reduce sweetener to 3 tbsp + add 1 tsp cinnamon for complexity. Or try using 100% cacao chocolate.
Nut-Free? Ultra Creamy! Replace nut butter with tahini (sesame paste). Add 1 extra tbsp coconut oil if mixture seems thin. Bonus Iron boost!
Raw & Refined Sugar Free: Use raw cacao powder (1 cup) blended with melted coconut butter (1/2 cup) & pitted Medjool dates (10-12 soaked in warm water).
Presentation Ideas Worthy of Celebration
Transform simple squares into stunning dessert moments:
- Artisan Gift Idea: Package in cellophane bags tied with twine & dried orange. Add recipe tag!
- Dessert Charcuterie: Pair with dried figs, candied ginger + nut butters for dunking.
- Flavor Inject: Press a tart cherry or espresso bean into each square pre-chill.
- Tea Party Upgrade: Serve with peppermint tea for a cool-warm contrast.
3 Common Mistakes That Can Sabotage Your Fudge Bliss
- Low-Fat Cream Substitution: Insisting on almond/soy milk instead of full-fat coconut guarantees oily/grainy failure. The fat is structural. No compromises!
- Overheating Chocolate: Over-hot chocolate > 120°F seizes or scorches. Gentle indirect heat wins. This is yourvegan chocolate fudge,vegan peanut butter fudge,gluten free vegan fudge,no bake vegan fudgecrucial step.
- Impatient Slicing: Cutting soft fudge causes crumbling. If knife sticks, let slab sit at room temp for just 5 mins. Wash/dry knife between cuts!
Keeping Your Batch Blissful Longer
Once cut, store layered between parchment in an airtight container.
- Refrigerator: 10 days max for peak texture & flavor. Cover well to prevent fridge odors.
- Freezer for Longevity: Freeze solid squares flat on tray first > transfer to bag/container. Thaw 10 minutes before eating. Keeps 3 months!
- Counter Hack: Fudge travels okay cool >75°F in sealed tin for 2 days max. Higher temps risk melt.
The Verdict: Trust the 5-Step Transformation
Thisvegan fudge reciperedefines easy elegance in dairy-free dessert land. Using simple ingredients found anywhere, it delivers deep chocolate satisfaction with a luxurious melt – proof that mindful indulgence is absolutely achievable. Whether modifying for dietary goals or gifting edible joy, this method adapts beautifully. So silence cravings sustainably! We challenge you to whip up a batch this week and rediscover what bliss tastes like. Snap a slice shot and tag us @CookCurve – we adore seeing your creamy triumphs!
FAQs
Q1: Can I use any plant-based milk instead of canned coconut milk?
A: Crucially, no! Only canned full-fat coconut milk provides the needed high-fat concentration for proper texture. Thin milks (almond, soy, oat) ruin consistency making your perfection just a soft mess!
Q2: How do I salvage “oily” or “grainy” vegan fudge?
A: Grains usually mean overheating chocolate seized your cocoa butter. Oily separation happens when fat quantities mismatch. Warm mix gently over double boiler stirring vigorously until homogeneous (under 110°F) and quickly rechill overnight.
Q3: Why is mine sticky even chilled?
A: Excess moisture prevents setting. Possible culprits: watery coconut cream (did you use only the solid cream?), overheating introducing steam, humid kitchen! Ensure all components stay dry.
Q4: Can I make variation likevegan peanut butter fudgethe same way?
A: Absolutely boost peanut butter to ¾ cup while lowering chocolate to 1.5 cups. For swirls: mix peanut butter separately with powdered sugar substitute & melt coconut oil → dollop onto main pan mixture → marble using knife! Thisno bake vegan fudge magic applies everywhere.
Q5: Is this truly gluten free vegan fudge?
A: Naturally! Provided all ingredient brands you choose are certified gluten-free (especially chocolate/vital wheat ingredient alerts) this recipe meets strict gluten-free & vegan diets perfectly.
Leave a comment if you try this recipe.
There are no reviews yet. Be the first one to write one.